Menu

Skip to content
  • Handleiding
  • Tutorials

2. Placing the paper roll

Install Star Printer

  • Install on Windows
    • 1. Connecting the printer
    • 2. Placing the paper roll
    • 3. Connecting the printer with the wireless network through a AP-networkmode
    • 4. Installing the driver on the computer
    • 5. Adding the printer to the computer
    • 6. Formatting the computersettings
  • Install on Mac
  • Install on tablet/smartphone iOS
    • 1. Prepare the Utility
    • 2. Select the printer from TSP100III Utility, and open the setting screen
    • 3. Set fixed IP address to the printer from Web Configuration
  • Install on tablet/smartphone Android
    • 1. Prepare the Utility
    • 2. Select the printer from TSP100III Utility, and open the setting screen
    • 3. Set fixed IP address to the printer from Web Configuration
  1. Home
  2. Install Star Printer
  3. Install on Windows
  4. 2. Placing the paper roll

2. Placing the paper roll

  1. To open the lid of the printer, you must push the latch to the right away from you and lift the lid.
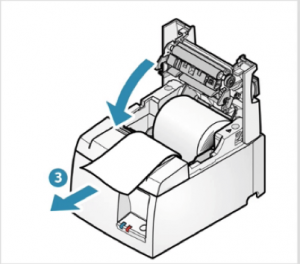
  2. Insert the paper roll in the direction shown below..
  3. Pull out the paper along the cutter at the front of the printer.
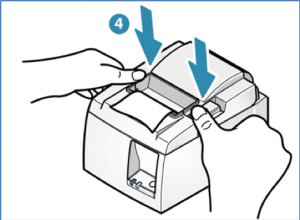
  4. Push the lid downwards to close the lock again.

Updated on 16 oktober 2018

Doc navigation

← 1. Connecting the printer3. Connecting the printer with the wireless network through a AP-networkmode →

Recente reacties

    Archieven

    Categorieën

    • Geen Categorieën

    Meta

    • Inloggen
    • Berichten RSS
    • Reacties RSS
    • WordPress.org
    Copyright © EasyOrder Wiki
    Powered by WordPress , Designed and Developed by templatesnext
    MENU
    • Handleiding
    • Tutorials